Spring Cloud Slueth
by Gunju Ko
Spring Cloud Slueth
Spring Cloud Slueth는 분산 트레이싱을 위한 Spring Cloud 프로젝트이다.
공식문서는 spring-cloud-slueth를 참고하길 바란다.
용어
Spring Cloud Slueth는 Dapper’s 용어를 사용한다.
- Span : 작업의 기본 단위. 예를 들어 RPC의 경우 요청을 보내고 받는것이 하나의 Span이 된다. Span은 64비트의 유니크한 ID를 가지며, 64비트의 TraceId를 가진다. Span은 description, timestamp, tag 등을 가진다. Span은 시작되거나 중지될 수 있으며 시작된 시간과 중지된 시간을 기록한다. Span이 생성되며 반드시 중지시켜야한다. Trace에서 최초로 생성된 Span은
root span이다. root span의 ID는 Trace ID와 같다. - Trace : Tree 형태를 가지는 Span의 집합.
- Annotation : 이벤트을 기록할 때 사용한다. Brave를 사용하면 누가 클라이언트고 서버인지 그리고 요청이 언제시작해서 끝났는지를 쉽게 알 수 있다.
- cs : Client Send. 클라이언트가 요청을 시작한다. 이 애노테이션은 Span의 시작을 나타낸다.
- sr : Server Received. 클라이언트가 요청을 받아 처리를 시작한다.
sr-cs는 서버와 클라이언트간의 네트워크 지연 시간이다. - ss : Server Sent. 요청의 완료될 때 사용된다. (응답이 클라이언트에 전송될 때)
ss-sr은 서버에서 요청을 처리하는데 걸린 시간이다. - cr : Client Received. Span의 완료를 나타낸다. 클라이언트가 서버로부터 응답을 받았다.
cr-cs는 클라이언트가 요청을 받는데까지 걸린 시간이다.
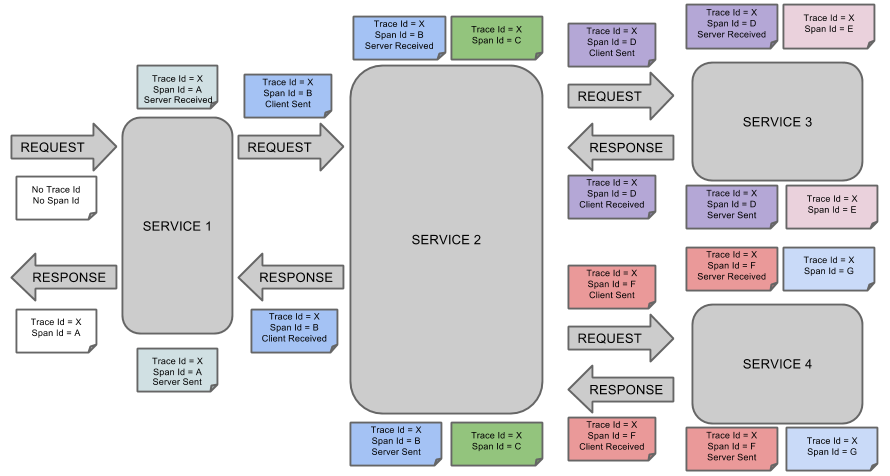
- 아래 그림은 Trace와 Span이 시스템에서 어떻게 생성되는지를 보여준다. 각각의 색깔은 Span을 의미한다.
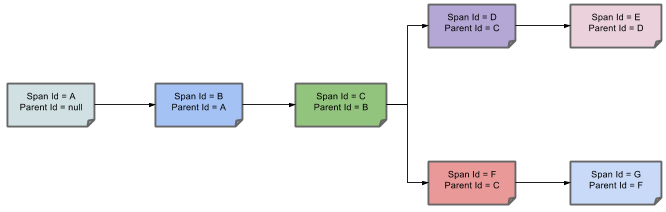
- 아래 그림은 Span의 부모-자식 관계를 보여준다.
목적
- Zipkin을 사용하여 분산 추적에 사용
- Span 정보를 토대로 요청이 어떤식으로 처리되었는지를 보여준다.
- 에러가 발생한 부분이 있으면 에러가 발생한 부분도 보여준다. 예외가 발생하면 발생한 예외를 Span의 태그로 추가한다.
Brave을 이용한 분산 추적
- Spring Cloud Slueth는 Brave 라이브러리를 사용해서 추적을 한다.
- 결과적으로 Slueth는 더이상 컨텍스트를 저장하는 역할을 하지 않고 Brave에게 위임한다.
Brave와 관련해서 더 많은 내용은 brave 를 참고하길 바란다.
Log correlation
- 로깅을 남길때 Span Id와 Trace Id를 남긴다.
- [product-name, trace-id, span-id, exportable]
Propagating Span Context
- span context는 하위 span에게 전달되어야 하는 상태이다.
- trace, span ID는 span context의 필수항목이며, Baggage는 선택 항목이다.
- Baggage는 key-value 쌍으로 span context에 저장된다.
- Spring Cloud Slueth는 HTTP 헤더중에 접두사가
baggage-인 경우 Baggage와 관련된 헤더라고 판단한다. 메시징의 경우 헤더중 접두사가baggage_인 경우 Baggage와 관련된 헤더라 판단한다. - 부모 Span의 Baggage는 자식 Span에게 전파가 된다.
- Zipkin는 Baggage 관련 정보를 받지 않는다.
- Tag는 특정 Span에서만 표시된다.
Adding Slueth to the Project
- 애플리케이션 이름이 Zipkin에 올바르게 표시되도록 하려면
spring.application.name을bootstrap.yml에 추가해라 - Zipkin없이 Spring Cloud Slueth를 사용하고자 한다면 아래 dependecy를 추가해라
<dependencyManagement>
      <dependencies>
          <dependency>
              <groupId>org.springframework.cloud</groupId>
              <artifactId>spring-cloud-dependencies</artifactId>
              <version>${release.train.version}</version>
              <type>pom</type>
              <scope>import</scope>
          </dependency>
      </dependencies>
</dependencyManagement>

<dependency>
    <groupId>org.springframework.cloud</groupId>
    <artifactId>spring-cloud-starter-sleuth</artifactId>
</dependency>
- Spring BOM을 사용하면 spring-cloud 관련 프로젝트의 버전관리를 직접하지 않아도 된다.
그 외에 경우는 공식문서를 참고하길 바란다.
- Slueth와 Zipkin을 함께 사용하는 경우
- Zipkin의 Sender 타입이
kafka혹은rabbitmq인 경우
Overriding the auto-configuration of Zipkin
- Spring Cloud Slueth는 트레이스를 여러 Tracing System에 보낼 수 있다.
- Tracing System은
Sender와Reporter<Span>구현체를 제공해야한다. Reporter<Span>구현체를 직접 구현한 클래스로 대체하려면 빈 이름을ZipkinAutoConfiguration.REPORTER_BEAN_NAME으로 등록해주면 된다.Sender의 경우ZipkinAutoConfiguration.SENDER_BEAN_NAME이란 빈 이름으로 등록하면 된다.
Features
- Slf4J MDC에 Trace, Span ID를 추가할 수 있다.
[appname, traceId, spanId, exportable]형식으로 로그에 추가된다. exportable은 Zipkin에 의해 수집되는지 여부를 나타낸다. - 분산 추적 데이터모델의 추상화(Trace, Span, Annotation, Key-value Annotations)를 제공한다.
- Spring Cloud Slueth는 HTrace를 기반으로 하지만 Zipkin과 호환된다.
- Slueth는 시간 정보를 기록하기 때문에 Latency 분석이 가능하다.
- Slueth는 HTTP 통신이나 메시지 전송등을 추적하는 기본 로직이 포함되어 있다.
- Context는 전파할 수 있다.
- Span을 생성할 수 있으며 애노테이션을 통해 태그나 로그를 추가할 수 있다.
spring-cloud-sleuth-zipkin에 대한 의존성이 있는 경우 Zipkin과 호환되는 Trace를 생성한다. 기본적으로 Zipkin 서버에 HTTP을 통해 Trace 정보를 전달한다.spring-rabbit에 대한 의존성이 있는경우 RabbitMQ로 Trace 정보를 전달한다.spring-kafka에 대한 의존성이 있는경우 Kafka로 Trace 정보를 전달한다.
- Spring Cloud Slueth는 OpenTracin과 호환된다.
Introduction to Brave
2.0.0버전부터 Spring Cloud Slueth는 Brave 라이브러리를 사용한다.- 대부분의 경우 Slueth가 제공하는 Brave의
Tracer또는SpanCustomizer Bean만 사용하면 된다. - Brave는 분산 작업에 대한 정보를 캡쳐하고 Zipkin에게 보낼때 사용하는 라이브러리이다. 대부분의 경우 Brave를 직접 사용하지 않는다.
Tracing
Tracer는 Zipkin에게 분산 데이터를 보내는 역할을 한다.- 아래 예제는 HTTP 통해 Zipkin에게 분산 데이터를 보내는 예제이다.
class MyClass {

    private final Tracer tracer;

    // Tracer will be autowired
    MyClass(Tracer tracer) {
        this.tracer = tracer;
    }

    void doSth() {
        Span span = tracer.newTrace().name("encode").start();
        // ...
    }
}
- Span의 이름은 최대 50 chars 이다.
- Tracer에 의해 생성된 Span은 샘플링 된 경우 Zipkin으로 데이터를 전송한다. Span이 시작된 이후에 tag을 추가하거나 할 수 있다.
- Span는 Trace 식별자가 포함된 Context를 가진다.
Local Tracing
@Autowired Tracer tracer;

// Start a new trace or a span within an existing trace representing an operation
ScopedSpan span = tracer.startScopedSpan("encode");
try {
  // The span is in "scope" meaning downstream code such as loggers can see trace IDs
  return encoder.encode();
} catch (RuntimeException | Error e) {
  span.error(e); // Unless you handle exceptions, you might not know the operation failed!
  throw e;
} finally {
  span.finish(); // always finish the span
}
- 만약에 Span의 더 다양한 기능을 사용하고 싶으면
Span타입을 사용해라
@Autowired Tracer tracer;

// Start a new trace or a span within an existing trace representing an operation
Span span = tracer.nextSpan().name("encode").start();
// Put the span in "scope" so that downstream code such as loggers can see trace IDs
try (SpanInScope ws = tracer.withSpanInScope(span)) {
  return encoder.encode();
} catch (RuntimeException | Error e) {
  span.error(e); // Unless you handle exceptions, you might not know the operation failed!
  throw e;
} finally {
  span.finish(); // note the scope is independent of the span. Always finish a span.
}
- 위 예에서 Span은 루트 Span 혹은 자식 Span이 된다.
Customizing Spans
- Span에 태그를 추가할 수 있다. 태그는 key-value 쌍이다.
- 만약에 서드파티가 Span을 커스터마이징 할 수 있도록 해주고 싶다면
Span보다는SpanCustomizer를 사용해라.Span은SpanCustomizer를 구현하고 있기 때문에 아래와 같이 사용이 가능하다.
interface MyTraceCallback {
  void request(Request request, SpanCustomizer customizer);
}

for (MyTraceCallback callback : userCallbacks) {
  callback.request(request, span);
}
Implicitly Looking up the Current Span
- 현재 진행중이 Span을 아래와 같이 주입받을 수 있다.
// The user code can then inject this without a chance of it being null.
@Autowired SpanCustomizer span;

void userCode() {
  span.annotate("tx.started");
  ...
}
Sampling
- Span이 샘플되지 않으면 오버헤드가 발생하지 않는다.
- 샘플링 여부는 처음에 결정된다. 그리고 샘플링 여부는 다운 스트림으로 전파된다.
- 기본적으로 global sampler는 모든 작업에 대해 동일한 비율로 샘플링한다.
Tracer.Builder.sampler를 통해서 샘플링을 조절할 수 있으며 기본 동작은 모든 요청을 샘플링한다.\
선언적 Sampling
- 애노테이션 기반으로 샘플링 할 수 있다.
- 대부분 경우 프레임워크의 인터셉터를 이용하여 샘플링을 자동으로 적용시킨다.
@Autowired Tracer tracer;

// derives a sample rate from an annotation on a java method
DeclarativeSampler<Traced> sampler = DeclarativeSampler.create(Traced::sampleRate);

@Around("@annotation(traced)")
public Object traceThing(ProceedingJoinPoint pjp, Traced traced) throws Throwable {
  // When there is no trace in progress, this decides using an annotation
  Sampler decideUsingAnnotation = declarativeSampler.toSampler(traced);
  Tracer tracer = tracer.withSampler(decideUsingAnnotation);

  // This code looks the same as if there was no declarative override
  ScopedSpan span = tracer.startScopedSpan(spanName(pjp));
  try {
    return pjp.proceed();
  } catch (RuntimeException | Error e) {
    span.error(e);
    throw e;
  } finally {
    span.finish();
  }
}
커스텀 Sampling
- 아래 처럼
Sampler구현체를 직접 구현해서 샘플링 여부를 결정할 수 있다.
@Autowired Tracer tracer;
@Autowired Sampler fallback;

Span nextSpan(final Request input) {
  Sampler requestBased = Sampler() {
    @Override public boolean isSampled(long traceId) {
      if (input.url().startsWith("/experimental")) {
        return true;
      } else if (input.url().startsWith("/static")) {
        return false;
      }
      return fallback.isSampled(traceId);
    }
  };
  return tracer.withSampler(requestBased).nextSpan();
}
Spring Cloud Slueth를 이용한 Sampling
- 샘플링은 Zipkin과 같은 tracing backend에만 적용된다. 샘플링 여부와 상관없이 로그에는 traceId와 spanId가 나타난다.
- 샘플링을 통해 시스템의 과부하를 방지할 수 있다.
spring.sleuth.sampler.rate의 기본값은 1초에 10개의 요청을 샘플링한다.- 직접 Sampler 클래스를 빈으로 등록하여 샘플링을 커스터마이징 할 수 있다.
Bean
public Sampler defaultSampler() {
    return Sampler.ALWAYS_SAMPLE;
}
- HTTP 헤더에
X-B3-Flags를 1로 설정하거나 메시지 헤더에spanFlags를 1로 설정하면 샘플링 설정과 관련없이 무조건 샘플링 된다.
Propogation
- Propogation은 동일한 Root에서 시작한 활동이 동일한 Trace로 수집되도록 하기 위해 꼭 필요하다.
- 예를 들어 HTTP의 경우 헤더를 통해 Trace Context가 전파된다.
   Client Span                                                Server Span
┌──────────────────┐                                       ┌──────────────────┐
│                  │                                       │                  │
│   TraceContext   │           Http Request Headers        │   TraceContext   │
│ ┌──────────────┐ │          ┌───────────────────┐        │ ┌──────────────┐ │
│ │ TraceId      │ │          │ X─B3─TraceId      │        │ │ TraceId      │ │
│ │              │ │          │                   │        │ │              │ │
│ │ ParentSpanId │ │ Extract  │ X─B3─ParentSpanId │ Inject │ │ ParentSpanId │ │
│ │              ├─┼─────────>│                   ├────────┼>│              │ │
│ │ SpanId       │ │          │ X─B3─SpanId       │        │ │ SpanId       │ │
│ │              │ │          │                   │        │ │              │ │
│ │ Sampled      │ │          │ X─B3─Sampled      │        │ │ Sampled      │ │
│ └──────────────┘ │          └───────────────────┘        │ └──────────────┘ │
│                  │                                       │                  │
└──────────────────┘                                       └──────────────────┘
- 위와 같은 전파 방법을 b3-propagation 이라 한다.
- 대부분의 경우 프레임워크를 사용하여 전파를 자동화한다.
- 아래와 같은 방법으로 서버와 클라이언트 사이에 전파 이루어진다.
@Autowired Tracing tracing;

// configure a function that injects a trace context into a request
injector = tracing.propagation().injector(Request.Builder::addHeader);

// before a request is sent, add the current span's context to it
injector.inject(span.context(), request);
@Autowired Tracing tracing;
@Autowired Tracer tracer;

// configure a function that extracts the trace context from a request
extractor = tracing.propagation().extractor(Request::getHeader);

// when a server receives a request, it joins or starts a new trace
span = tracer.nextSpan(extractor.extract(request));
Propagating extra fields
- 만약에 필드를 추가적으로 전파하고 싶으면 아래와 같이 하면 된다.
// when you initialize the builder, define the extra field you want to propagate
Tracing.newBuilder().propagationFactory(
  ExtraFieldPropagation.newFactory(B3Propagation.FACTORY, "x-vcap-request-id")
);

// later, you can tag that request ID or use it in log correlation
requestId = ExtraFieldPropagation.get("x-vcap-request-id");
- 전파 필드가 추가된 경우에 전파가 중간에 끊키게 되면 원하는대로 동작하지 않을수 있으므로 다운스트림에 모든 필드를 전파 해주는게 좋다.
- Spring Cloud Slueth에서는
Tracing.newBuilder()의 인스턴스가 빈으로 등록된다. 따라서 만약에 커스텀PropagationFactory를 사용하고 싶으면 해당 타입의 빈을 등록하면 된다. 그러면Tracing빈에 세팅된다.
Prefixed fields
- 공통적인 접두사를 가진 경우 접두사를 이용해서 전파할 필드를 추가할 수 있다.
Extracting a Propagated Context
TraceContext.Extractor<C>는 HTTP 요청과 메시지로부터 Trace 식별자와 샘플링 상태를 읽는다.
Sharing span IDs between Client and Server
Extractor.extract는 Trace 컨텍스트를 리턴한다.Tracer.joinSpan는 가능하면 동일한 Span ID를 사용해서 Trace를 계속 하려고 시도한다. 만약 동일한 Span ID를 사용할 수 없는 경우 자식 Span을 생성한다. 만약 동일한 Span ID를 계속해서 사용하는 경우 Shared가 true로 된다.
                   ┌───────────────────┐      ┌───────────────────┐
 Incoming Headers             │   TraceContext    │      │   TraceContext    │
┌───────────────────┐(extract)│ ┌───────────────┐ │(join)│ ┌───────────────┐ │
│ X─B3-TraceId      │─────────┼─┼> TraceId      │ │──────┼─┼> TraceId      │ │
│                   │         │ │               │ │      │ │               │ │
│ X─B3-ParentSpanId │─────────┼─┼> ParentSpanId │ │──────┼─┼> ParentSpanId │ │
│                   │         │ │               │ │      │ │               │ │
│ X─B3-SpanId       │─────────┼─┼> SpanId       │ │──────┼─┼> SpanId       │ │
└───────────────────┘         │ │               │ │      │ │               │ │
                              │ │               │ │      │ │  Shared: true │ │
                              │ └───────────────┘ │      │ └───────────────┘ │
                              └───────────────────┘
Tracing.Builder.supportsJoin(false)를 통해 위와 같은 Join을 disable 시킬수 있다. 이 경우Tracer.joinSpan()을 호출하면 항상 새로운 Span을 생성한다.
Current Tracing Component
Tracing.current()메소드를 통해 가장 최근에 Tracing 객체를 가져올 수 있다.Tracing.currentTracer()메소드를 통해서는 Tracer만 가져올 수 있다.
Current Span
Tracer.currentSpan()메소드를 통해 현재 진행중인 Span을 가져올 수 있다. 현재 진행중인 Span을 가져와서 새로운 자식 Span을 생성하거나 Tag을 추가할 수 있다.
Tracer빈을 주입받아서Tracer#currentSpan()메소드를 통해 현재 Span을 가져올 수도 있다.
Setting a span in scope manually
- Span을 생성하는 경우 생성된 Span을 Current Span으로 만들어야한다.
withSpanInScope메소드를 이용하면 파라매터로 전달된 Span을 현재 Span으로 만들고SpanInScope객체를 리턴한다.SpanInScope가 close될 때까지 current span으로 유지된다. SpanInScope는Closeable을 구현하고 있기 때문에 try-with-resource 구문을 사용하는것이 편리하다.
// Assume a framework interceptor uses this method to set the inbound span as current
 try (SpanInScope ws = tracer.withSpanInScope(span)) {
   return inboundRequest.invoke();
 // note: try-with-resources closes the scope *before* the catch block
 } catch (RuntimeException | Error e) {
   span.error(e);
   throw e;
 } finally {
   span.finish();
 }

 // An unrelated framework interceptor can now lookup the correct parent for outbound requests
 Span parent = tracer.currentSpan()
 Span span = tracer.nextSpan().name("outbound").start(); // parent is implicitly looked up
 try (SpanInScope ws = tracer.withSpanInScope(span)) {
   return outboundRequest.invoke();
 // note: try-with-resources closes the scope *before* the catch block
 } catch (RuntimeException | Error e) {
   span.error(e);
   throw e;
 } finally {
   span.finish();
 }